A Journey to a World of High-Quality Image Rendering

Imagine, you’re sitting in your cozy home office, sipping a cup of hot cocoa, while marvelling at the latest high-quality rendered images on your screen.
You’ve heard of Stable Diffusion, a state-of-the-art AI-powered tool that can create stunning visuals, and you’re eager to try it.
But where to start? Don’t worry! I’m here to guide you on a journey to master the art of installing Stable Diffusion.
So, let’s embark on this exciting adventure together!

Our journey begins in Python, where we need to acquire a magical tool that will empower us in our quest. This tool is none other than Python 3.10.6 itself! While newer versions of Python may promise to be more powerful, they come with a curse; errors that may hinder our path.
So, stick to Python 3.10.6, and you’ll be safe.
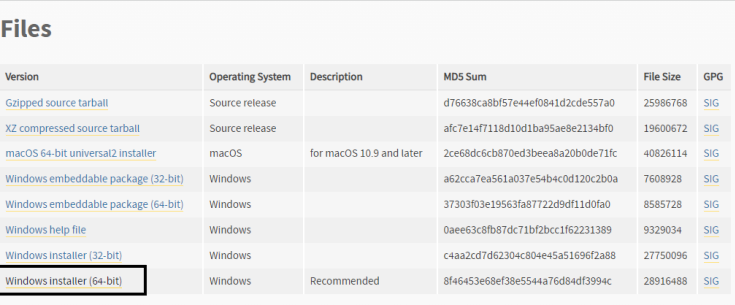
Step 1#
Visit the enchanted website where Python 3.10.6 resides. Click on the “Windows Installer 64-bit” version and download it to your system.
Step 2#
Launch the installer and click on “Install.” Watch as Python 3.10.6 effortlessly integrates into your system. Once you see the “Setup successful” message, you can close the installer.
Onwards to the Git Fortress
With Python in our arsenal, we make our way to the Git Fortress. Here, we’ll seek the wisdom of Git for Windows—a vital tool that will help us navigate the labyrinth of code repositories.
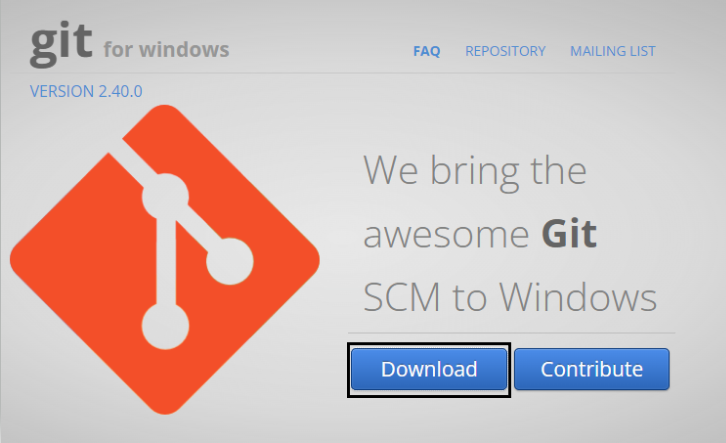
Step 3#
At the gates of the Git Fortress, you’ll find a large “Download” button. Click on it and download Git for Windows.
Step 4#
Start the Git installer and traverse through the installation process. You can leave the default settings as they are. Click on “Install” and behold the power of Git.
The GitHub Repository
With Git as our trusty companion, we enter the maze of GitHub repositories. Our destination is the ,Automatic 1111 page, where the secrets of Stable Diffusion lie.
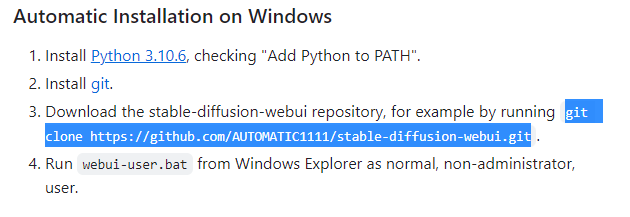
Step 5#
Upon reaching the Automatic 1111 page, scroll down until you spot the “Automatic Installation on Windows” section. There, you’ll find a gray area with text that reads “git clone [URL]”. Carefully copy this incantation, but beware the period at the end is a trickster! Leave it behind.
Step 6#
Summon the Command Prompt by typing “CMD” in the search bar.

In the black window that appears, paste the “git clone” incantation and press enter. A new folder materializes on your C drive: a treasure chest containing Stable Diffusion!

Delving into the C Drive
It’s time to unlock the treasure chest and unveil the wonders within. Let’s delve into the C drive and explore the Stable Diffusion Web UI.
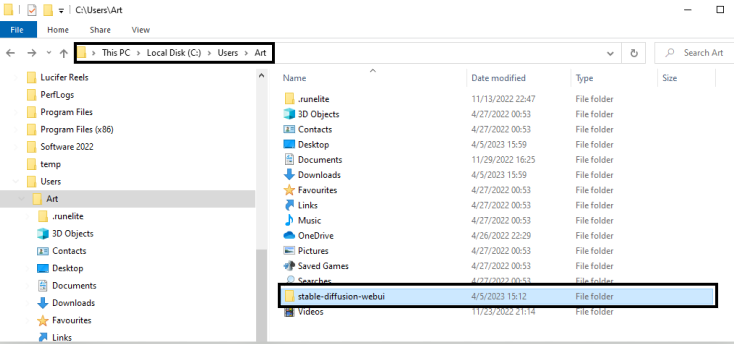
Step 7#
Open the File Explorer and navigate to C:Users[Your User Account]stable_diffusion_web_UI. Within, you’ll find the setup for Automatic 1111.
Our next stop is the realm of Hugging Face, where we’ll obtain the model for Stable Diffusion 1.5. But beware!
The Hugging Face requires you to create an account and agree to its requirements.
Step 8#
Once you’ve gained entry to the Hugging Face realm, seek the “Prudent EMA only” file. Download it and place it in the folder stable_diffusionmodelsstable_diffusion. The model holds the key to unlocking Stable Diffusion’s full potential.
Step 9#
While some adventurers choose to rename the downloaded model file to “model”, you have the freedom to keep its original name. After all, remembering the version of the model could be useful in the future. You decide which “Version” you want to download. I downloaded stable-diffusion-v1-5. Go to Files & Versions.

Download “v1-5-prunned-emaonly.ckpt”.

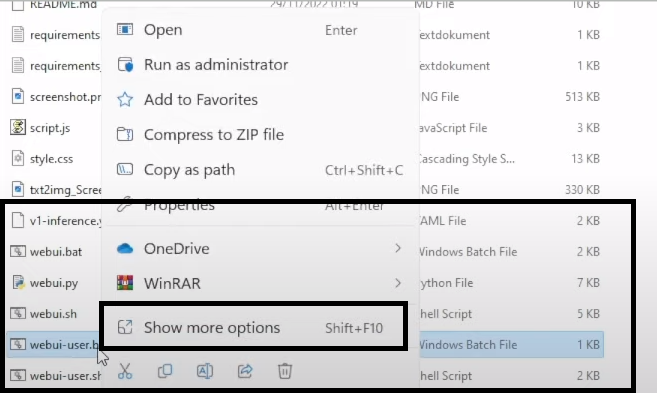
The Web_UI_user.bat
As we venture into the realm of Stable Diffusion, we encounter the mystical scroll known as “web_UI_user.bat”. This scroll is a gateway to a world of endless creativity, and it’s time to harness its power.
Step 10#
Right-click on the “web_UI_user.bat” scroll and select “Show more Options”, then click “Edit”, Inside, you’ll find arcane symbols and words; a code that must be updated to match your system.
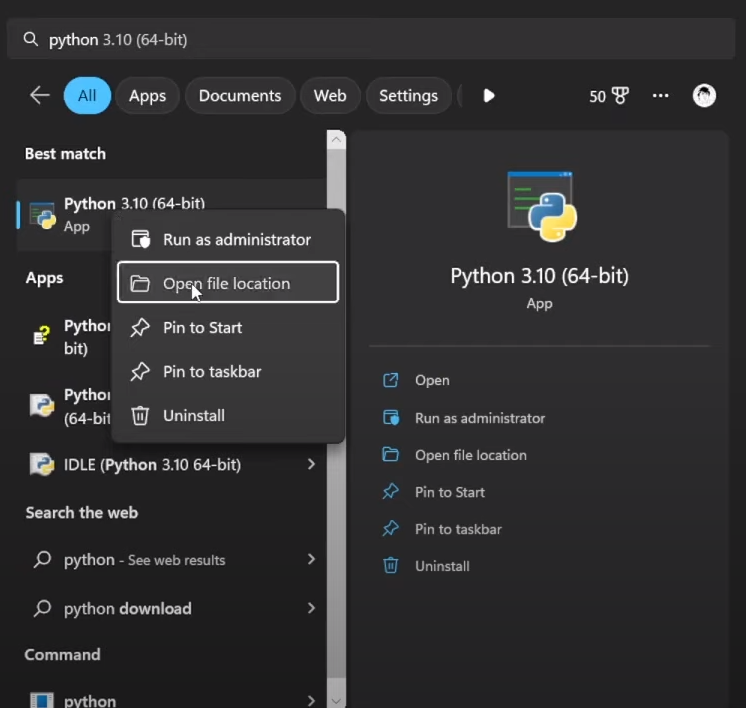
Step 11#
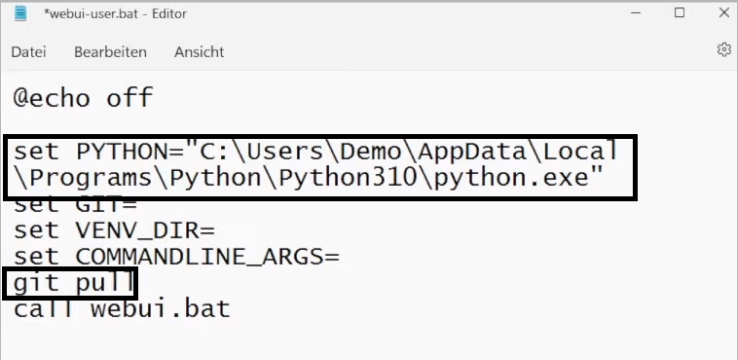
Update the Python path in the scroll. To do this, search for Python on your computer, right-click on it, and select “Copy as path”, Paste the copied path where it says “python” in the scroll.
Step 12#
Invoke the spell of automatic updates by writing “git pull” between “set command args” and “call Web_UI” in the scroll. This spell ensures that Stable Diffusion remains up to date on your system.
Step 13#
Save the scroll and close it. The time has come to double-click on “web_UI_user.bat” and unleash its power. It will take quite a while to finish the download, just leave the window open until it is finished.
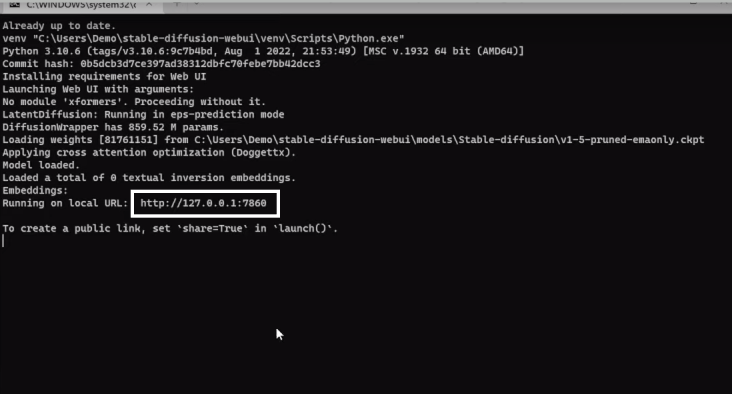
Watch as Stable Diffusion comes to life, and a local URL appears; your gateway to the world of high-quality image rendering.
The Local URL
With anticipation and excitement, we approach the portal to Stable Diffusion. This is where your imagination comes to life.
Step 14#
Copy the local URL displayed in the Command Prompt and enter it into your web browser. As you hit enter, you’re transported to a realm of possibilities.
Step 15#
In this new realm, you can select the Stable Diffusion checkpoint 1.5, and access extensions that enhance your creative experience. Install the “Forum” extension if you wish to craft mesmerizing videos.
Troubleshooting Tips
No journey is complete without challenges, and we’re here to guide you through them. If you’re equipped with a low-RAM video card, fear not! The Wiki on Automatic 1111 offers troubleshooting tips to help you navigate.
Step 16#
Visit the Wiki and click on “Troubleshoot”. There, you’ll find valuable advice for low-RAM video cards. Implement the suggested arguments by adding them to the “web_UI_user.bat” scroll behind “set command line args”.
If you need need visual guidance, this video from Olivio Sarikas might be helpful!
https://www.youtube.com/watch?v=3cvP7yJotUM&t=358s
The video above is from a YouTube Channel named “,Olivio Sarikas” and All rights belong to their respective owners.
The World of Stable Diffusion
Congratulations, intrepid adventurer!
You’ve successfully installed Stable Diffusion on your Windows system, and a new chapter begins. This is where your creativity takes flight, and you explore the boundless possibilities that Stable Diffusion offers.
Whether it’s rendering a breath-taking landscape or bringing a fantastical creature to life, Stable Diffusion is your canvas. And while this may be the end of our journey together, it’s just the beginning of your creative exploration.
So, go forth and create, and remember – the magic of Stable Diffusion is now in your hands.
Thank you for embarking on this adventure with me, and until our paths cross again, happy rendering!
Relevant Articles:
Furry Stable Diffusion AI: Guide and Several other Models