Today I will cover an interesting AI tool.
You might have heard about Stable Diffusion already, and it is described as a machine learning model used for generating images from text, filling in details on low resolution, and modifying images based on text.
This tool has gained popularity among mainstream movie and TV studios, as well as individual content creators on platforms such as:
Stable Diffusion is similar to Midjoruney or DALL-E2; it has been trained on billions of images and can produce results comparable to the ones we mentioned.
How does Stable Diffusion Work?
This model, just like Google’s imagen, uses a frozen encoder text (CLIP ViT-L/14) to condition the model on prompts.
First, we want to make sure your PC is capable of running Stable Diffusion. It requires 4 GB of dedicated GPU memory; make sure you also have 10 GB of free hard drive space. To use it, we need to get two pre-requisites:
Git is used for source control management, but in our case, we will use it to download Stable Diffusion and also to keep up to date. (Install GIT, we need it later on)
Python is a programing language, and Stable Diffusion is written in Python.
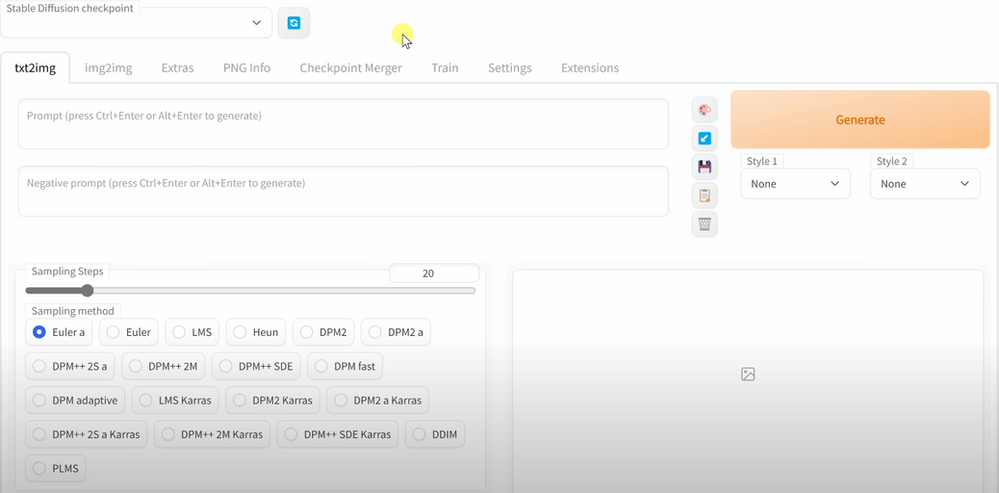
How to install Stable Diffusion?
To install SD, open fire explorer and press the windows key with E (Windows + E); you will have fire explorer opened. Then go to where you want to install stable Diffusion, right-click and create a Stable Diffusion folder, then click into the folder you just created; in the address bar, type “cmd”, which opens up the command prompt. Now, we need to get all of the Stable Diffusion files, and we are going to use GIT to do that by creating a clone of the repository, do the following in the command prompt:
"D:/stable-diffusion>git clone https://github.com/AUTOMATIC1111/stable-diffusion-webui.git"Once you write this, hit Enter, it will take time to clone the files in the repository. After you have cloned the repository, when you click back to file explorer, you will realize there is now a new folder named stable-diffusion-webui, and if you click into that, you will see all the associated repository files.
Next, you need to download the checkpoint or model and choose one of the two versions (depending on your preference). The models vary from one another, as they will provide you with different styles of images.
Once you finish downloading the file, rename your file to “model.ckpt”, then select the file and navigate it to “stable-diffusion” folder > then “stable-diffusion-webui” > then find the folder named “Models” > then click on “Stable-Diffusion”, and here press control V (Ctrl + V) to paste the model file here.
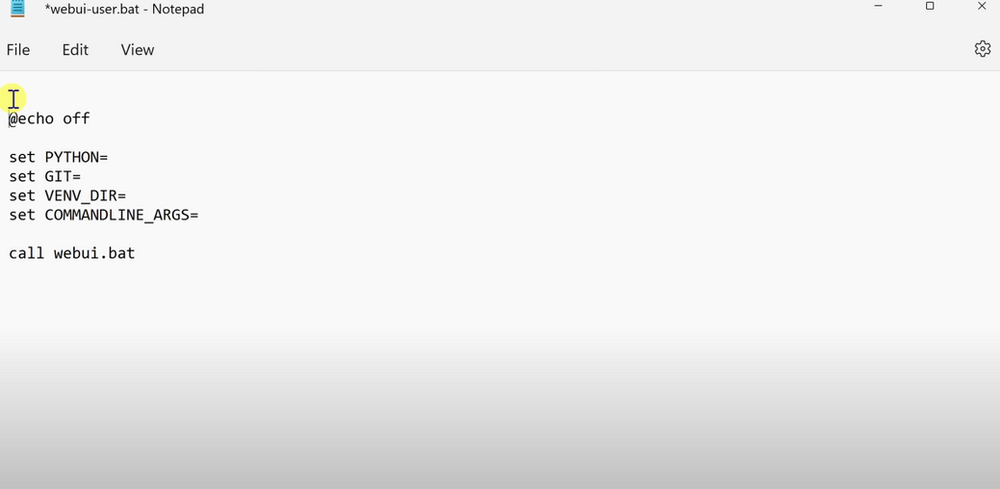
To always keep up to date with the latest version of Stable Diffusion, go back to > “Stable-diffusion-webui”, scroll to the bottom of the page, and find the file named > “webui-user.bat”, right click on it to make an optimization that will always ensure to have the latest version of Stable Diffusion> click on show more options > in this menu click on edit. This opens up a notepad and type: git pull above “@echo off”.

Save your file; this way, you will always keep up to date with the latest version.
Please get back to your webui-user.bat > double-click on it. This will install various dependencies to be able to work, and this will take some time; after it is finished installing all the dependencies > you copy + C “Local URL”, as seen in the following image:

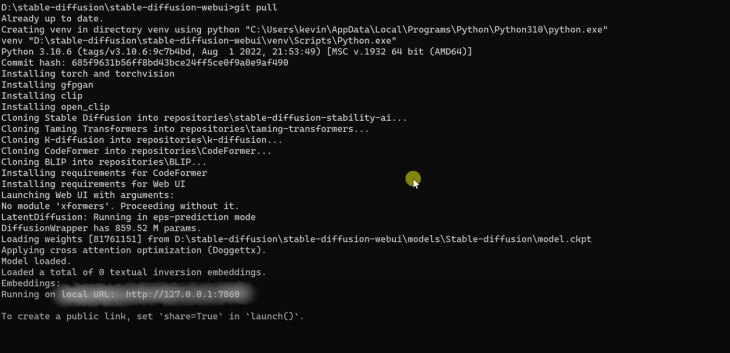
Paste this URL in Google’s address bar, opening up the Stable Diffusion web User Interface.

Let’s Get Back to How Stable Diffusion Works
Stable Diffusion is an AI model that has been developed for image generation; it will separate the image generation process into a diffusion process. The model will start with only noise and overtime will improve the images until there is no noise left; this consequently will provide an image close to a provided text prompt.
The model was trained on a cluster of 4.000 Nvidia A100 GPUs operating in Amazon Web Services, and the Ludwig Maximilian University of Munich supported the training.
The Stable Diffusion public release model was under a Creative ML OpenRail-M License. This is a license that allows commercial and non-commercial usage; it is focused on the ethical and legal use of the model as your responsibility and must accompany any distribution of the model.
Remember that the models were trained on image-text pairs from all across the internet; they may produce some societal stereotypes and even produce explicit content.
You can find model cards, code and weights here.
How to Create Avatars with Stable Diffusion
In this case, we will use a pre-trained that has information that recognizes people and objects.
You might only want to try to generate Avatar-like images; therefore, you can use Google’s graphic processing unit (which is free).
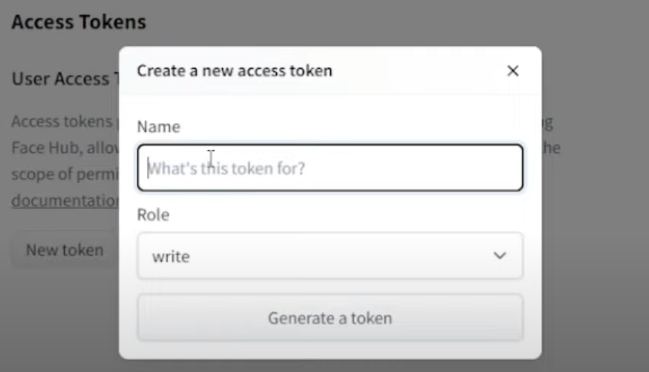
After you generate your token from “Hugging-Face“, get your token:

Install xformer (which is a requirement):


Click “save_to_gdrive:“:


Create an output directory (this will require your google drive access):


As you run this, it will ask for permission to access to connect Google Drive.
The initial setup at this point is done. At this point, you will start training the model.

Scroll down to “instance_prompt“: > create the “instance_prompt“: which is the name you want to put in the model, and replace the text, “photo of zwc dog” with your name.

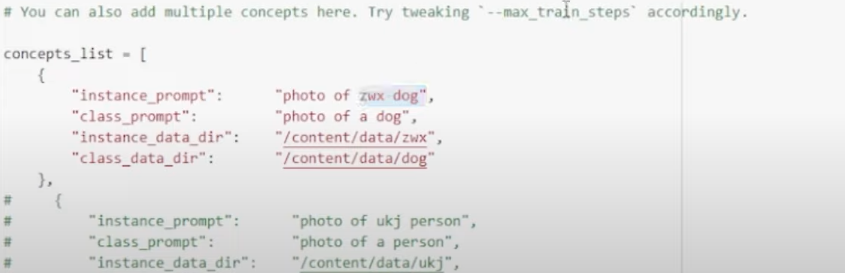
For example, “instance_prompt”: “Art”, “class_prompt”: “Portrait of a man” > afterward, every time you want to see your face remember to write the prompt “Art” (your name in your case).
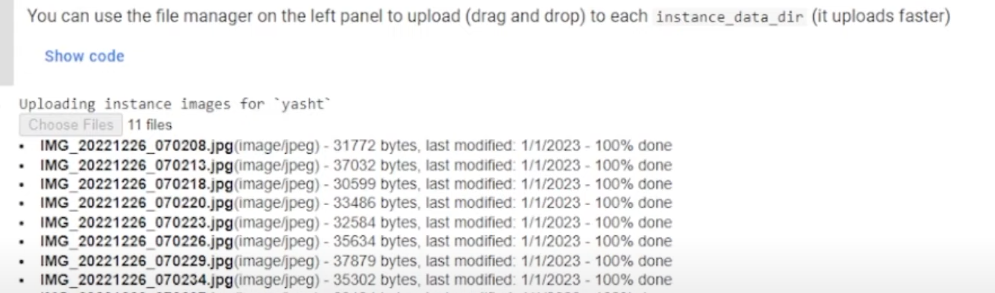
The important part is to Upload your images; remember the size of the image (512×512); you can use Birme (It is free) to resize your images.
Upload all the files you want to use; you can train up to 30 images; the more images you upload, the better results you are likely to get.

Now, scrolldown to “[ ] !accelerate launch train_dreambooth.py “:

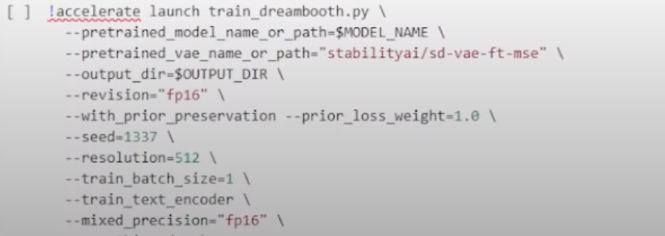
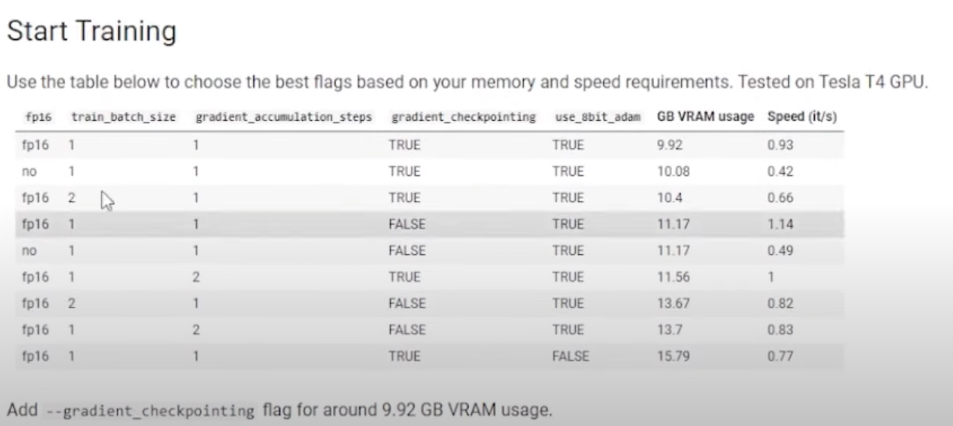
This part is vital, as you need to explain to model certain iterations it has to do for it to create the images for you as required. I will explain some of these > “max_train_steps is the number of training it will go through”, so multiply your images for 80 and use that number in (30 images x 80 = 2400) “max_train_steps=2400“. Whereas, the lr_warmup_steps should be the 10% of your max_train_steps, meaning 240 in this case > the numb_class_images should be multiplied by 12, meaning (30 x 12) numb_class_images=360. This is where the actual training of the model begins!
The following example is supposedly training 30 images:
-lr_warmup_steps=240
-num_class_images=360
-sample_batch_size=4
-max_train_steps=880
Ensure that you do not make mistakes on these steps; otherwise, it will take a while because you will need to start from scratch. This will take close to 2 hours to train 30 images.
Generating Your Avatars with Stable Diffusion
Once your model is set up, you can start generating your portraits; you don’t have to do any further training.
Run for generating images:
- Prompt: portrait of your name, in the style of artgerm, gerald brom, atey ghailan and mike mignola, vibrant colors and hard shadows and strong rim light, plain background, comic cover art, trending on artstation, and etc.
- Negative prompt: Poorly rendered face, blurry, poorly formed eyes, poorly formed hands, deformed fingers, poorly drawn face, bad composition, mutated body parts, blurry image, disfigured, oversaturated, bad anatomy, and deformed body, etc.
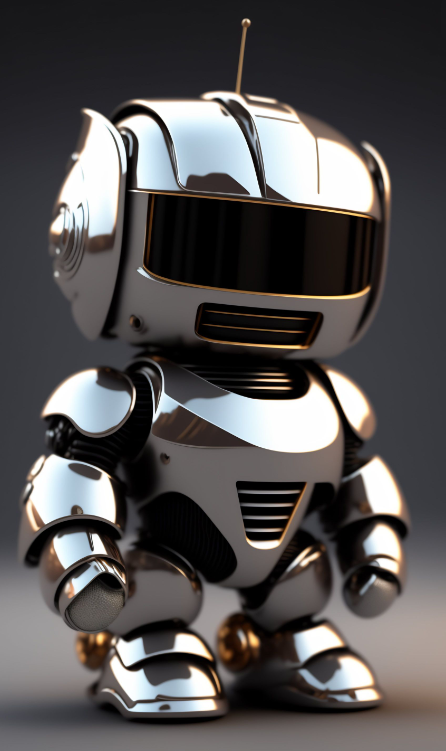
You can use lexiva.art to get these types of prompts, for example:
prompt: cute 3d render of toy art robocop.

All you have to do is play with the “prompt:” until you feel like you got what you want.
I will explain prompt: and negative prompt here.
- Prompt – What you want to load in the image
- Negative Prompt – The things you do not want to see in the image
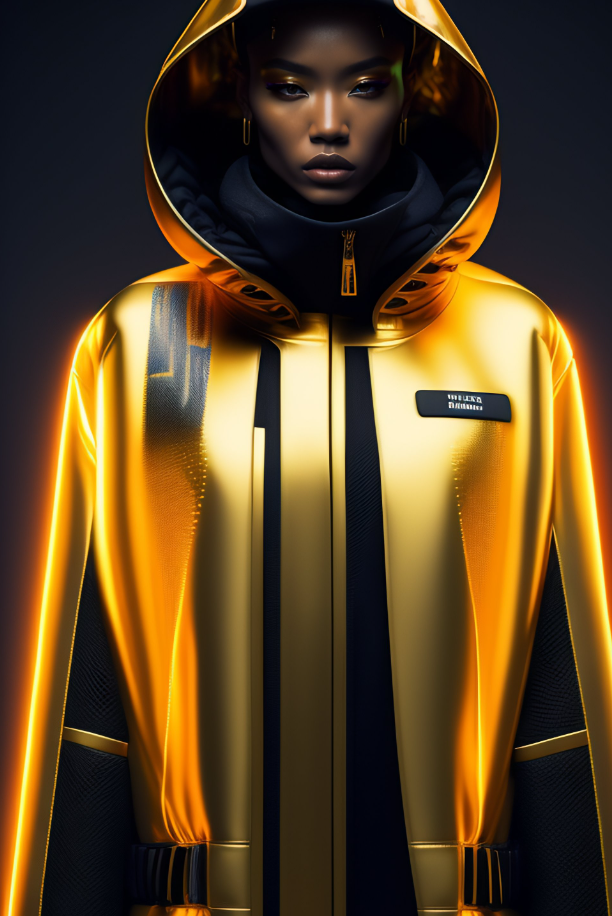
For example, prompts: cyberpunk techwear looks and clothes, we see them from feet to head, beautiful bright colors, futuristic, cyberpunk setting,, Nike ACG, Yohji Yamamoto, Y3, ACRNYM. The result of these prompts was this:

Stability AI has made the Stable Diffusion model accessible to a select group of users through it Discord Server. This allows these users to leverage the power of the model to generate high-quality images.
In conclusion, I personally find Stable Diffusion as a complex way of generating images, whereas Midjourney provides the same results with less effort, and computer knowledge. The whole process makes it tiresome, and I would only suggest this to those that fully know what they are doing. Other AI image generating tools are easier to use, and save you tons of time.
Compared to other AI tools that generate images Stable Diffusion’s key feature is the ability to handle immense amounts of data quickly and efficiently; it can process petabytes of data in seconds, making it a game-changer with individuals or organizations that deal with a large amount of data on a daily basis.
If Stable Diffusion decides any time soon to simplify the process of generating images, I highly recommend it, as it generates very high-quality images.